Cracked driveways, damaged steps, crumbling kerbs, or worn-out factory floors? Don’t let failing concrete compromise safety or aesthetics. While traditional cement repairs have their place, modern epoxy-based concrete repair compounds offer superior strength, durability, and adhesion for long-lasting results. This guide will walk you through the process of using these powerful materials to fix concrete like a professional.
Why Choose Epoxy for Concrete Repair?
Epoxy repair materials are two-part systems (a resin and a hardener) that chemically cure to form an incredibly strong, rigid plastic. Compared to standard cement mixes, they offer:
- Exceptional Strength: Often stronger than the original concrete itself.
- Superior Adhesion: Bonds tenaciously to prepared concrete surfaces.
- Chemical Resistance: Stands up well to oils, fuels, salts, and many chemicals.
- Fast Curing: Many formulations allow for rapid return to service, minimising downtime.
- Low Shrinkage: Cures with minimal shrinkage, ensuring a tight, durable repair.
- Versatility: Suitable for everything from fine cracks to large patches and bedding applications.
Choosing the Right Epoxy Repair Product
Different types of damage require slightly different products. Here’s a general guide:
- For Larger Holes, Spalled Edges, and Re-profiling Floors/Kerbs: Look for a High-Strength Epoxy Repair Mortar. These often contain aggregates and are designed to be trowelled into place, providing structural bulk and a durable finish.
- For Filling Fine Cracks and Small Holes: A thinner consistency Epoxy Crack & Hole Filler is ideal. These can penetrate smaller defects and provide a smooth, sealed surface. Some come in convenient cartridge formats.
- For Deep Repairs or Structural Bonding: A versatile Multi-Purpose Structural Epoxy Compound can be used. These often have excellent adhesive properties and can sometimes be used as both a bonding agent and a repair mortar.
- For Setting Posts, Kerbstones, or Manhole Frames: A specialised Rapid-Set Epoxy Resin Bedding Mortar is required. These are designed for flowable or trowelable application to create a strong, fast-setting base.
Always check the product description to ensure it’s suitable for your specific application (e.g., depth of repair, load-bearing requirements, interior/exterior use).
Own Label Hard Landscaping Products
Get private label building chemicals and hard landscaping products. We design and produce innovative building chemicals for some of the biggest names in the industry, find out what we can do for you!

Step-by-Step Guide to Epoxy Concrete Repair
Step 1: Safety First!
Always wear appropriate Personal Protective Equipment (PPE):
- Safety glasses or goggles
- Chemical-resistant gloves (nitrile or butyl rubber)
- Long sleeves and trousers
- Dust mask (especially during preparation)
- Consider knee pads for floor work.
Work in a well-ventilated area.
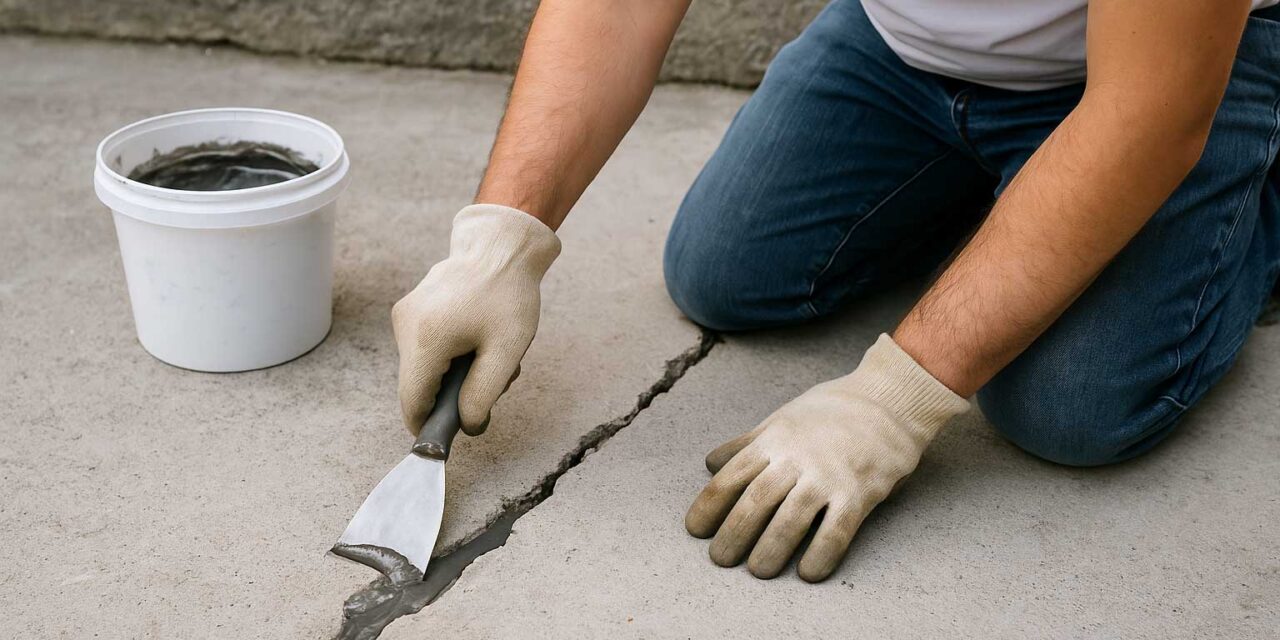
Step 2: Prepare the Damaged Area (Crucial!)
This is the most important step for a successful repair. Epoxy needs a clean, dry, and sound surface to bond effectively.
- Clean: Remove all dirt, dust, grease, oil, paint, and any previous failed repair material. Use a stiff brush, vacuum cleaner, pressure washer (allow thorough drying afterwards), or specialised concrete degreaser if necessary.
- Remove Loose Material: Chip away any crumbling, weak, or unsound concrete using a hammer and chisel, angle grinder with a masonry disc, or a scabbler. Ensure the edges of the repair area are solid. Undercutting the edges slightly (making the bottom of the repair slightly wider than the top) can sometimes improve mechanical keying.
- Ensure it’s Dry: Epoxy resins generally don’t bond well to damp surfaces unless specifically formulated to do so (check product details). Concrete should be visibly dry for at least 24-48 hours, depending on conditions. A hairdryer or heat gun (used cautiously) can help dry smaller areas.
- Priming (If Required): Some epoxy systems require a specific primer to be applied first. Always check the manufacturer’s instructions for the product you are using.
Step 3: Mix the Epoxy Compound
Epoxy repair products typically come in two (or sometimes three) parts that MUST be mixed in the precise ratio specified by the manufacturer.
- Read Instructions Carefully: Proportions, mixing times, and methods vary between products.
- Use Clean Tools: Use clean mixing buckets, paddles, or sticks.
- Measure Accurately: Use the supplied containers or accurate measuring tools if mixing partial batches (though mixing full packs is usually recommended for accuracy).
- Mix Thoroughly: Combine the components and mix for the specified time (often 2-5 minutes) using a slow-speed drill with a mixing paddle or by hand for smaller amounts. Ensure all material from the sides and bottom of the container is incorporated and the mix is uniform in colour and consistency. Avoid whipping air into the mix.
- Be Mindful of Pot Life: Epoxy starts curing as soon as it’s mixed. You only have a limited time (the ‘pot life’) to apply it before it starts to harden. Only mix as much as you can comfortably apply within this window. Pot life is usually shorter in warmer temperatures.
Step 4: Apply the Epoxy Compound
- For Mortars: Firmly press the mixed mortar into the repair area using a steel trowel or float. Ensure it’s well-compacted to fill all voids and eliminate air pockets. Build up in layers if necessary for very deep repairs (check product instructions for maximum layer thickness).
- For Crack Fillers: Pour or inject the filler directly into the crack or hole. For very fine cracks, a cartridge-based system or syringe might be needed.
- For Bedding Mortars: Pour or trowel the material into the prepared void to the required level before setting the item (e.g., kerbstone, post) into place.
Step 5: Finish the Surface
- Trowel the surface of mortars smooth, level with the surrounding concrete. Slightly overfilling and then screeding level can work well.
- Wipe away any excess filler neatly.
- A trowel wiped lightly with a suitable solvent (check manufacturer recommendation – *do not* use water unless specified) can sometimes help achieve a smoother finish, but use sparingly.
Step 6: Curing
- Protect the repair from traffic, moisture, and extreme temperatures during the curing period specified by the manufacturer.
- Curing times vary significantly based on the product and ambient temperature (epoxy cures faster when warm, slower when cold). Check the datasheet for initial set time (can be touched) and full cure time (ready for full load/traffic).
Tips for Success
- Temperature Matters: Most epoxies perform best within a specific temperature range (often 10°C – 25°C). Avoid applying in very cold or very hot conditions unless using a specially formulated product.
- Work in Manageable Batches: Especially in warm weather or when using fast-setting products, only mix what you can apply within the pot life.
- Clean Tools Promptly: Clean tools immediately after use with the recommended solvent, as cured epoxy is extremely difficult to remove.
- Follow Instructions: We can’t stress this enough – always adhere strictly to the manufacturer’s instructions for the specific product you are using.
By following these steps and using the appropriate high-quality epoxy repair compound, you can achieve durable, professional-standard repairs to your concrete surfaces, restoring their integrity and appearance for years to come.
Own Label Hard Landscaping Products
Get private label building chemicals and hard landscaping products. We design and produce innovative building chemicals for some of the biggest names in the industry, find out what we can do for you!


Recent Comments