Is your patio looking a little tired? Are weeds creeping through the gaps, or are the slabs starting to feel uneven? The solution might be simpler than you think: re-jointing your paving. Filling the gaps between your patio slabs, path pavers, or driveway blocks not only vastly improves the appearance but also enhances stability and crucially helps suppress weed growth.
Forget the back-breaking traditional sand and cement methods of the past. Modern jointing compounds make achieving a professional, long-lasting finish easier than ever. This guide will walk you through the process.
Why Bother Jointing?
- Appearance: Clean, filled joints give your paved area a sharp, finished look.
- Stability: Properly filled joints lock pavers together, preventing rocking and movement.
- Weed Prevention: Creates a barrier that makes it much harder for weeds to take root.
- Drainage: Some compounds allow water permeability, helping drainage.
- Longevity: Protects the bedding layer beneath the pavers from being washed away.
Own Label Hard Landscaping Products
Get private label building chemicals and hard landscaping products. We design and produce innovative building chemicals for some of the biggest names in the industry, find out what we can do for you!

Choosing Your Jointing Material
There’s a range of easy-to-use products available, moving away from fussy mixes. Here are the main types:
- Sweep-In Resin Jointing Compounds: These are incredibly popular for DIY projects. Often ready-mixed, you simply brush them into the joints. They cure hard, are typically permeable, and offer good durability and weed resistance. Look for standard versions for typical patios or professional-grade formulations for higher traffic areas or enhanced longevity.
- All-Weather Jointing Compounds: A lifesaver in unpredictable climates! These advanced resin compounds can often be applied even in damp conditions or light rain (always check specific product guidelines). They are excellent for wider joints and provide a very robust finish.
- Patio Grouts/Slurry Grouts: These often require mixing with water to form a slurry that is poured or worked into the joints. They can provide a very strong, non-permeable finish, suitable for certain applications or where maximum strength is needed. Application can be slightly more involved than sweep-in types.
For most standard patios and pathways, a sweep-in resin jointing compound offers the best balance of ease-of-use and performance. Consider an all-weather type if you need to work in less-than-ideal conditions or have particularly wide joints.
Getting Started: Preparation is Key!
Proper preparation guarantees the best results and makes the application process smoother.
- Check Stability: Ensure your paving slabs are firmly bedded and not rocking excessively. Address any loose slabs before jointing.
- Clean Out Joints: This is the most crucial step! Remove all old jointing material, dirt, debris, and especially weeds and roots from the gaps. A pressure washer (used carefully not to disturb the bedding layer) or specialised joint cleaning tools work well. Aim for a clean, clear joint to the required depth (check product instructions – usually at least 20-25mm).
- Clean the Surface: Thoroughly sweep or wash the patio surface to remove any loose dirt or grit. This prevents contamination of the joints and makes cleaning up excess compound easier.
- Check the Weather: Unless using an all-weather compound, you’ll typically need a dry spell during application and for the initial curing period (usually 12-48 hours – check the product details). Avoid extreme heat or frost.
- Gather Your Tools: You’ll need:
- The jointing product
- Stiff broom (for sweeping in)
- Soft broom (for final clean-up)
- Pointing tool or trowel (optional, but useful for compacting)
- Hosepipe with a spray nozzle (essential for most resin compounds)
- Gloves
- Bucket of water
Applying Sweep-In Jointing Compound: The Easy Steps
(Always refer to the specific instructions on your chosen product, but this is the general process for sweep-in resin types)
- Pre-Soak the Paving: Thoroughly wet the entire area where you’ll be working. This prevents the resin from staining the slabs and helps the compound flow into the joints. Keep the surface wet throughout application.
- Empty the Compound: Open the packaging (often a vacuum-packed bag inside a tub) and empty the compound directly onto the wet paving. Spread it out reasonably evenly.
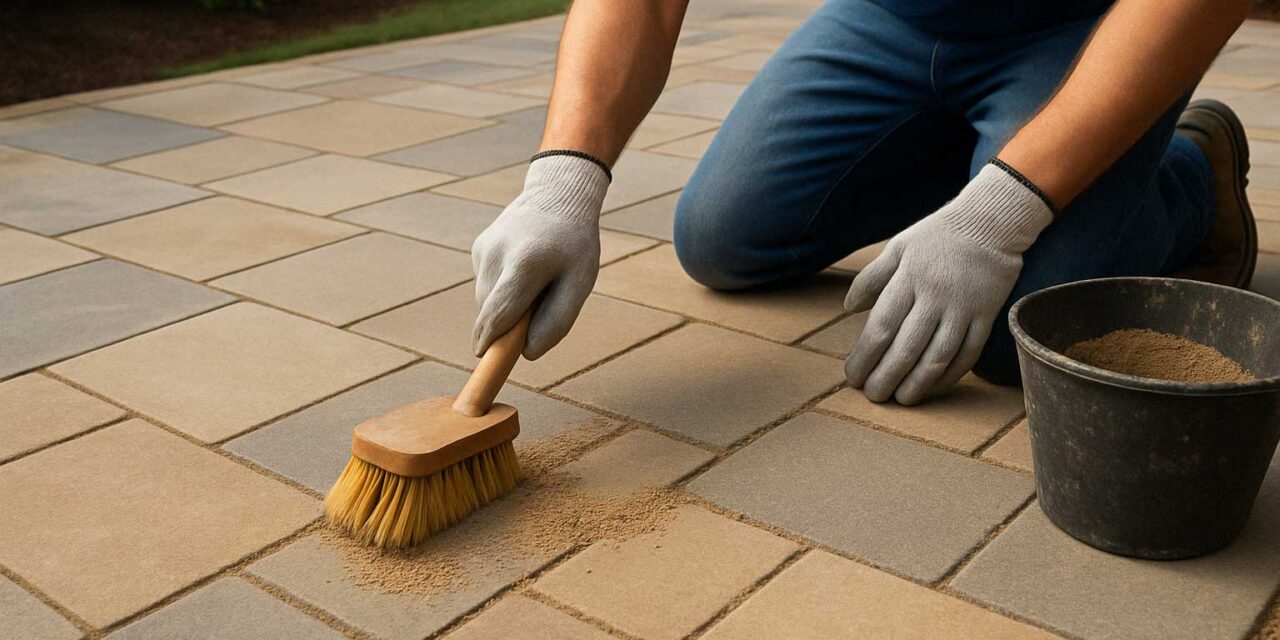
- Sweep In: Using the stiff broom, sweep the compound firmly into the joints. Work diagonally across the pavers to ensure joints are filled from all directions. Make sure the compound fills the entire depth of the joint.
- Compact (Optional but Recommended): For the most durable finish, lightly compact the compound into the joints using a pointing tool or a small piece of wood. This removes air pockets and ensures a dense fill. Top up with more compound if needed after compacting.
- Gentle Water Spray: Apply a light spray of water over the area – this helps the compound settle and begins the curing process (check product instructions, as methods vary slightly).
- Final Clean Sweep: This is critical! Before the compound starts to cure, use the soft broom to carefully sweep all excess compound off the surface of the paving slabs. Sweep diagonally. Rinse the patio lightly with the hose if recommended by the instructions, ensuring no piles of compound are left on the slab faces. Any residue left to cure on the surface can be very difficult to remove later.
- Cure: Keep foot traffic off the area for the recommended curing time (typically 24-48 hours, but check your product). Protect from rain if necessary (unless using an all-weather product that allows this).
Top Tips for Success
- Work in Sections: On larger areas, work in manageable sections to prevent the compound from starting to cure before you can sweep the excess off the surface.
- Don’t Skimp on Cleaning: Clean joints are essential for good adhesion and longevity.
- Read the Instructions: While processes are similar, always follow the specific guidance for your chosen product regarding water use, temperature, and curing times.
- Protect Drains: Prevent compound from washing into drains during application and clean-up.
Maintaining Your Perfect Joints
Once cured, your new joints will require minimal maintenance. Regular sweeping and an occasional wash-down should keep them looking great and performing well for years, giving you a patio to be proud of!
Own Label Hard Landscaping Products
Get private label building chemicals and hard landscaping products. We design and produce innovative building chemicals for some of the biggest names in the industry, find out what we can do for you!


Recent Comments